How-to Instructions
Easy step-by-step instructions: how to edit in the Omni CMS editor.
Review our editing and publishing rules before editing in Omni CMS.
Process to prevent multiple editors from working on the same page simultaneously and overriding each others changes.
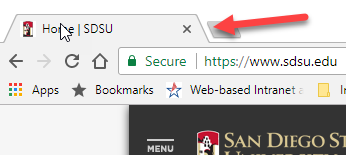
- Open the page you want to edit in a Web browser
- Scroll to the bottom of the page
- Click on the "Last Updated (modified date)"
- At the SDSU Shibboleth Login screen, enter your SDSUid username and password
If you are not able to log in, please contact your Omni CMS administrator.
How to Check Out a File
To edit a page or file, you must check it out.
- Check out the file by clicking on the unlit light bulb
 (yellow indicates it is checked out
  )
) - After you have checked out a page, no other users can edit the page and make changes until the file has been checked back in.
Once you are finished making updates to a page, you must check the file in. By doing so, this allows anyone else with access to that page to check it out and make changes to it.
How to Check In a File
Once you are done editing a page, you must check it back in. This is very important to make the page available for other users.
Submit the Page for Approval
- When a page is submitted for an approval, the page will automatically be checked out to the approver. The Pending Approval status will show in both the user and approver’s Workflow. No other action is needed.
Click on the Lit (Yellow) Light Bulb
- If you have a page checked out to you, the light bulb icon will be lit (yellow). You can check the content back in by clicking on the lit light bulb icon. Doing so will dim the light bulb icon (black outline) and check the page back in.
When you publish the file/page it will automatically check the file/page in.
What to do if a File is Checked out by Someone Else
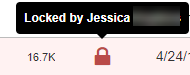
If you are unable to edit a page and a red padlock ![]() icon is located next to the file, this indicates someone else has the file checked
out.
icon is located next to the file, this indicates someone else has the file checked
out.
- Hover your mouse over the red padlock to see the name of the user that has the file
checked out
- Using the Omni CMS Inbox, send the user a message to ask them to check in the page in if they are completed with their edits.
All checked out files must be checked in so others may access them to modify content.
Dashboard: My Checked Out Content
- From your Omni CMS Dashboard, you will see an area called My Checked Out Content. This will list any files that you currently have checked out.
- To check in the file, click the lit light bulb icon to the left of the file name.
- Once you check in the file, the file name will disappear from the list.
- If you do not have any files currently checked out, the list will be empty.
Gadget: My Checked Out Content
- Find your Gadgets sidebar on the right of Omni CMS.
- If the Gadgets icon is collapsed, click the Show Gadgets icon
 to expand the menu.
 - Find the “My Checked Out Content” gadget from the drop-down list. Click the caret
icon to expand the gadget.
- If My Checked Out Content' option is not available in gadget drop-down, click on the icon next to Gadget (Manage Sidebar window will open), check next to this option and save. It will appear immediately.
- This gadget will show you a list of all files you currently have checked out.
- To check in the file, click the lit light bulb icon to the left of the file name.
- Once you check in the file, the file name will disappear from the list.
- If you do not have any files currently checked out, the list in the gadget will be empty.
Learn how website files consisting of pages, images, documents, etc. are organized into folders.
The main folder is called the root folder. The root folder contains all other folders and files in that account. Each folder signifies a section of the website and it has multiple files (which are displayed as Web pages in a browser) as well as additional folders (which include more files). Omni CMS file extension is “.pcf.” After the .pcf files are published their extension becomes .aspx. Every Folder of the website will include the following items:
The Index file is the “Homepage” for the folder that it lives in. The index.pcf file name cannot be changed or removed from the section folder.
Most folders will include additional page files (i.e. about, apply, etc.) All page files end in “.pcf”.
The section you are in may have subsections. For example, “Job Seeker” is a subsection of the folder “Human Resources.” If you are in the Human Resources folder, you will see a folder called “Job Seeker.”
The images folder is where all images in that section are saved.
The “docs” folder is where all documents included in the section are saved (typically these are pdfs or other documents that have been linked to on various pages of the section).
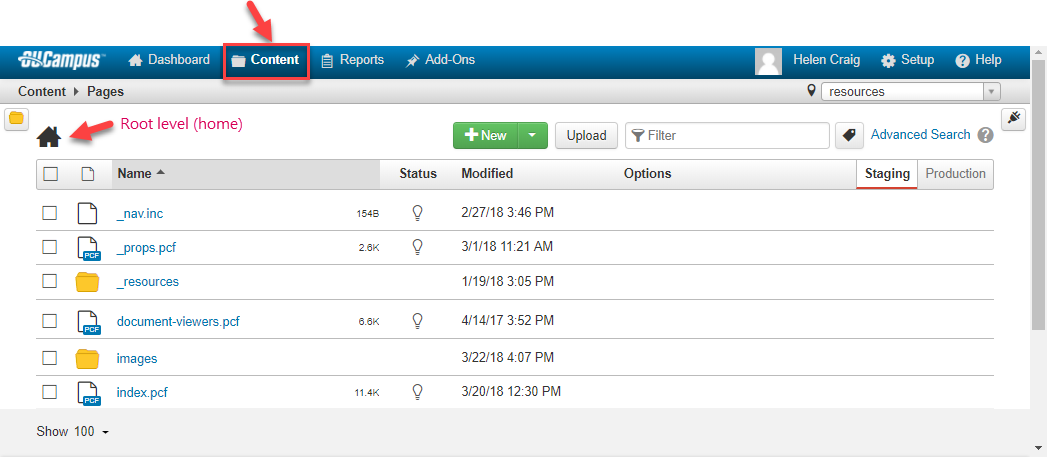
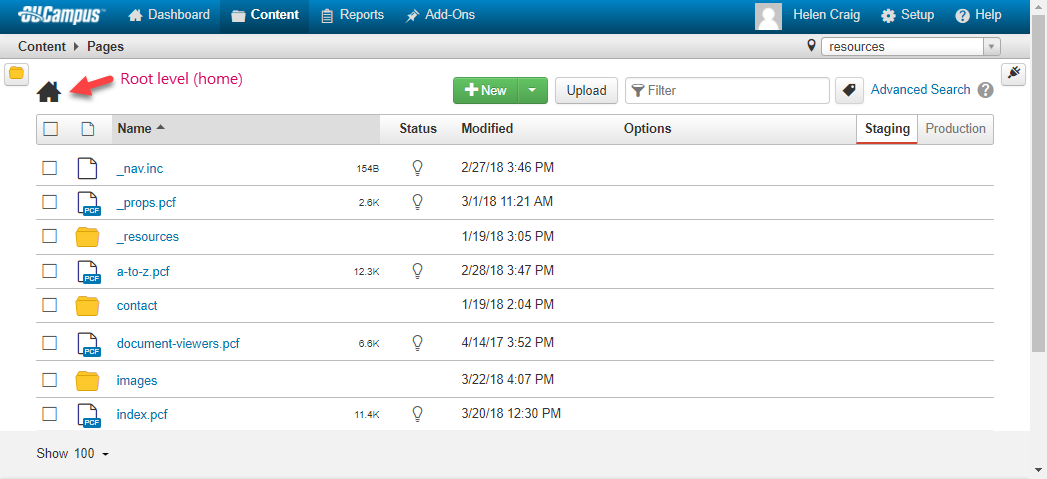
Navigate via Site Folders (Sections) and Pages Structure
Pages may be viewed in Omni CMS by navigating to it through the folder structure on the Page List Area of Omni CMS.
Select > Content (in blue global navigation bar) The file structure appears at the top level (root).
Avoid Setting Images to Fixed Sizes
Changing images significantly larger or smaller than the actual image often causes a few problems when viewing the content on mobile devices, primarily:
- setting a fixed image size may break the responsive layout, so the page doesn't display properly on small screens
- displaying a large image at a small size (rather than editing the image to make it smaller) still requires the user to download the large image on their mobile device
- displaying a small image at a larger size than the original resolution of the image degrades the image quality, so it is usually best to ask for a higher resolution image, if possible.
Upload, add, overwrite images and documents.
Images must be the same size within a snippet or asset.
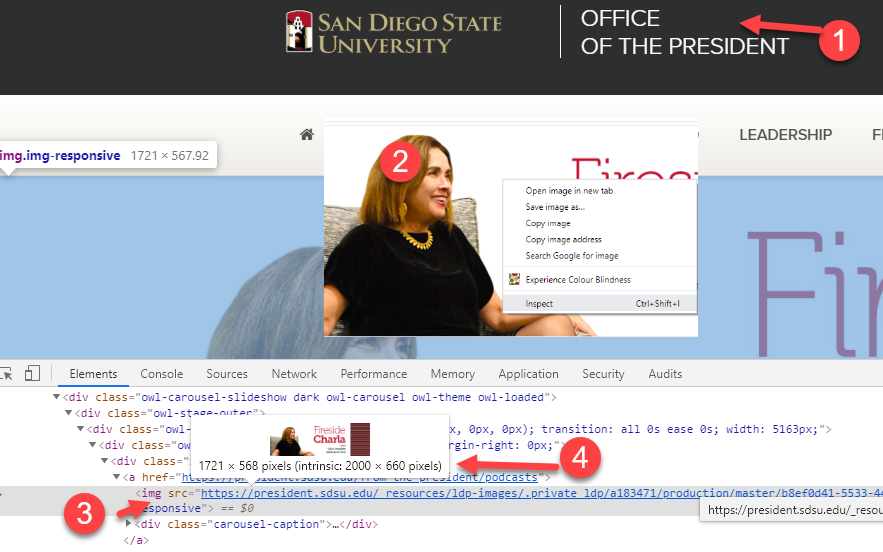
Find Image Size
To learn the size of an image:
- from the web page with image (size) of interest, right click the mouse on the image of interest, select: Inspect option, image code will appear with img source highlighted
- mouse over the img src information, a new box will appear; use the intrinsic size
(e.g. 2000 x 660 pixels) to mimic the size of the image

- From global navigation bar, select: Content, then Pages

- From page view, select: Upload
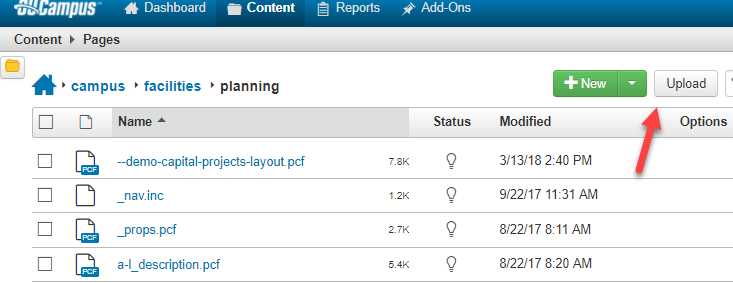
- Either drag and drop an image or document from your desktop, then 'Start Upload' or 'Add' an image/document and select from a file on your computer then, 'Open' and 'Start Upload'.
- After image/document has uploaded, publish it.
if you publish the page without the image/document being published first, the page may reflect a broken image or 404 error for an unpublished document. It is a good practice to publish them immediately after upload for this reason. Don't forget to publish the page you added the uploaded image or document to.
- Put the cursor on the location where you want the image or document
- Click the 'Insert/Edit Image' or 'Insert/Edit Link' button in the toolbar
- Click the 'Browse' button to the right of the text box
- Find where the image/doc is located and select it. Some accounts store them at OU home icon: Select _resources, images, then view the images by right clicking over an image and select open. You may either use back arrow to return to images or "Cancel".
- Browse to the image/document you want, then click on it and click "Select File"
- Enter an image description, which describes the image for non-sighted people using assistive technology. The image description must be greater than seven characters, and cannot contain the word "image" or "picture" in the description. If this is a decorative image, like a bullet icon, then check the "decorative image" box. This will assign a null value to the image description, and will be ignored by assistive technology, screen readers.
- Click "Insert"
- After image/document has uploaded, publish it.
Warning: if you publish the page without the document being published first, the page will reflect a 404 error (publish the document). It is a good practice to publish them immediately after upload for this reason.
- Put the cursor on the location where you want the image/document
- Click 'Upload'
- Click in box next to 'Overwrite Existing' box
- Either use 'Add' button and select an image/document then select 'Open' or drag a file from desktop
- The filename and size of file will appear
- Select 'Start Upload'.
- It will inform you of successful completion
- Click "Insert"
- Once image/document is uploaded the window will close automatically
Decisions
Image size decisions must be made within each area, either on an account-wide basis or on a site-by-site basis. Occasionally there may be a reason to change the size for a section but it will only matter; if a low-resolution image is used or the images will go into a carousel (they must be the same size within the carousel). Consult with your OU Account Administrator regarding image sizes for your website(s).
Size Limit
- There is a size limit of 1MB for uploaded images. If you receive this error message upon uploading it: 'Exceeds upload size limit (size of file here)', and the image size is under 1MB, the image was probably named incorrectly. Rename the image before uploading it again.
Naming Convention
- use lower case
- hyphens between words
- keep names brief but clear
- using an apostrophe is not allowed.
The recommendation is to only use the following characters:
- lowercase letters (a - z)
- numbers (0 - 9)
- hyphen (-), underscore (_), and period (.)
We recommend using hyphens as word separators because they are recognized as such by search engines. Use underscores only when there would be confusion otherwise such as a hyphenated last name (e.g newton_john). Periods should only be used for file extensions, as they can be confusing when used elsewhere in filenames, and some systems/applications don't support it.
In cases like O'Neil, use either oneil or o-neil. If this is for a particular site and there is a chance to document it, pick one and stick with it.
- Publish images after uploading them to avoid broken images after you publish the page using the image.
- Keep all images in an image folder.
Note: if the extension is missing from the file name (e.g. .jpg or .doc) you may receive a message indicating the file has exceeded the size limit. Try saving it again with the appropriate extension for a successful outcome.
LDP option is in the college template.
- From page view; enable LDP through Properties option (user level 6 or higher).
- Select LDP.
PNG format is recommend over JPG format to minimize seeing unwanted compression artifacts.
Note: LDP is meant for displaying multiple images, not a single image. For single image, from Properties, select Hidden instead of LDP Gallery and insert an image.
Image Gallery
Strategic Communications and Public Affairs (StratComm) has compiled a gallery of images for San Diego State University use.
Visit SDSU Photo Gallery
If you are looking for more specific photos, contact [email protected] in StratComm for assistance. More photos beyond those shown in the gallery are available. StratComm will work with campus partners on a case-by-case basis.
Contribute to Gallery
StratComm would love to add your photos to this gallery. The photos must be licensed to share and approved by your department for campus-wide use.
Add, edit, remove page links (aka: dependency tags)
Internal page links references pages in OU websites.
Every page, document and image on OU websites are given a unique dependency tag identifier. By inserting the dependency tag in a link, content throughout the site will be automatically updated when the linked content is moved or renamed.
Example of a what this page’s dependency tag looks like:

- Within the Editor, select the text for the link.
- From the toolbar, click the Insert/Edit Link button.
- The Insert Link Modal will appear.
- If you know the dependency tag for the page you are linking to, type it into the text field next to URL.
- Most times you won’t know the dependency tag. To look it up, click the button with a folder and magnifying glass icon (to the right of the URL Text Field).
- The Select File Modal will appear.
- From the drop-down menu in the upper right corner, select Production.
- Using the folder structure in directory on the left, navigate to the page you wish to link to.
- You will automatically be in the same section of the page you are currently editing.
- If you wish to link to a page outside of the section you are currently in, use the blue breadcrumb links at the top of the modal to navigate to other sections of the site. Click on www to be taken to the root directory.
- If you’re not sure which folder the content is in, use the content page’s URL to help you figure it out.
- After you have found the file you wish to link to, you need to edit or add the text you wish the link to display.
- In the text box next to Text to Display, type how you would like the link to appear on the page.
- Note: If you highlighted text before clicking the Insert Link Button, the words you highlighted will automatically appear in the Text to Display text box. You can change this or leave it as is.
- Once you have the URL (dependency tag) and entered the Text to Display, click insert.
- You will be returned to the Editor for the page and the content you highlighted will now be a link.
You may also link to external websites. Use caution when doing this as you cannot control other websites. If the site you are linking to changes, moves, or closes, you will be left with broken and outdated links. If you choose to link to an external site, be sure to review your pages consistently to ensure links still work.
- Within the Editor, select the text for the link.
- From the toolbar, click the Insert/Edit Link tool.
- The Insert Link Modal will appear.
- Type the full URL into the text field next to URL. Be sure to start with http:// or https://.
- Next, you need to edit or add the text you wish the link to display.
- In the text box next to Text to Display, type how you would like the link to appear on the page.
- Note: If you highlighted text before clicking the Insert Link Button, the words you highlighted will automatically appear in the Text to Display text box. You can change this or leave it as is.
- Once you have the URL and entered the Text to Display, click OK.
- You will be returned to the Editor for the page and the content you highlighted will now be a link.
- From the Editor, click on the link you wish to edit. You do not need to highlight it, just make sure your cursor is somewhere inside the link.
- From the toolbar, click the Insert/Edit Link tool.
- Alternatively you can right-click on the link and select Insert/Edit Link.
- The Insert Link Modal will appear and show you the current link information.
- You can change the URL or the text to display or the button class.
- If the link is currently a button and you want it to just be a link, select (not set) from the drop-down menu.
- Once you have made your changes, click OK.
- You will be returned to the Editor for the page and the link will be edited.
Links to Internal and External Pages
If you want to remove the link and the text, simply highlight the entire link and click backspace or delete from your keyboard.
If you wish to remove the link, but keep the text you should:
- From the Editor, click on the link you wish to edit. You do not need to highlight it, just make sure your cursor is somewhere inside the link.
- From the toolbar, click the
 Remove Link tool.
 - The link will be removed but the text will stay.
Removing a link to a PDF does not remove the PDF. Even once the link is gone, the PDF will remain live and thus searchable through Google or other search engines. If you wish to remove both the link and the PDF, you should:
- Follow the regular steps of removing a link.
- Contact your account administrator to have them delete the PDF file from the production server.
Create a new section and associated pages.
After the development website is turned over to your department and your Account Administrator has established your credentials, it is time to create a new section and associated pages.
- Open a web browser (e.g. Chrome, Mozilla Firefox, etc.)
- Go to the web page to be edited then scroll to the bottom of the page.
- In the footer, click on the “Last Updated (modified date)”
- At the SDSU Shibboleth Login screen, enter your SDSUid username and password
- Once logged in, the web page will open with edit screen but the appropriate green tab must be selected (there may be more than 1) to start editing.
- Only after a green tab has been selected will the icons appear and editing may begin (notice the background will darken and the active editable region will lighten.)
- Save and exit when editing is complete. View changes in Preview mode (this is how the page will appear when published) if everything looks as expected, either submit or publish the file (only 1 option will be available based on how your account is set up).
- To update a different page in the website, select Content and/or Pages (Pages option will appear when mouse is placed on Content in the Global Navigation Bar) to see the structure of the website. Then navigate through file structure to get to the next page to be updated.
From the Global Navigation Bar, select: Content then Pages (from drop-down menu)
Page view will appear:
Select option: ![]() (template options will appear)
(template options will appear)
Choose: New Section - a New Section window will open, complete the fields as specified
under each field:
- Folder Name - * all lowercase, use hyphen (-) between words, keep name brief (e.g. staff-events)
- Sectional Title (it can be removed afterwords if decided to do so)
- Template * (select: New Section)
- Page Title * (this appears in tab of rendered page)
- Description (optional)
- Tags (optional)
- Add Navigation Item - * (Yes or No)
- Overwrite Existing
- Access Group ('Inherit from Parent' is the default)
- When fields are finished, select: Create
- It will automatically open up the index.pcf of the new section: start populating your homepage with data.
- Save and exit the changes when done.
- Select: Preview to ensure it's ready to be tested through Publish option.
- Select: Publish option then 'Run All' test to check for spelling and accessibility errors. If errors are indicated, close window, don't publish yet.
- Go back into index.pcf file and correct errors, test again until it test successfully.
- Prior to publishing the index.pcf, note the 2 new files in page view that were created
with the new section:
- the nav.inc (navigation.include) if you specified navigation 'Yes' for this section, any new files you create in this section will automatically populate in the navigation (except props.pcf). You must publish nav.inc or a Server Error '/' in Application will appear when you publish the index.pcf without it.
- props.pcf (property) this file manages the contact information that appears in left column if they were checked via the Properties option of the page.
- Scroll down to Contact Info then select it and Save.
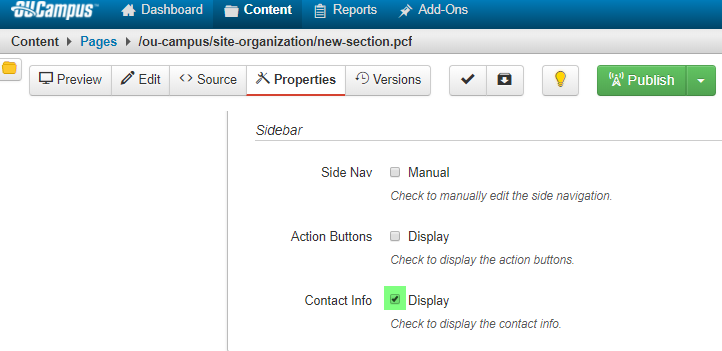
- Contact information will appear in left column under navigation area. Do not publish the props.pcf. Instead, the PCF files within this directory that are affected by this update must be republished for changes to appear in that section.
- Select "Content" tab > "Pages"
- Navigate to the section folder, that will be the parent of the new page
- Click on the "+ New" button
- Select the template type you want to create
Note: Alternatively, you can click the down arrow to the right of the "New" button and select the template type from the drop-down list.
Enter the following information:
- Page Title: A descriptive title for your page, can contain upper and lower case letters and spaces.
- Description: A description of what this page is about.
- Tags: Click on a tag from the list, used for search engine optimization.
- Add Navigation Item: Set equal to "Yes," if you want the page to be in the automatically generated site navigation; set equal to "No," if you want to manually create links to the page.
- File Name: enter the file name for this page, should be lower case letters without spaces or special characters.
- Overwrite Existing: Set equal to "unchecked."
- Access Group: Set equal to "(inherit from parent)."
Click the Create button.
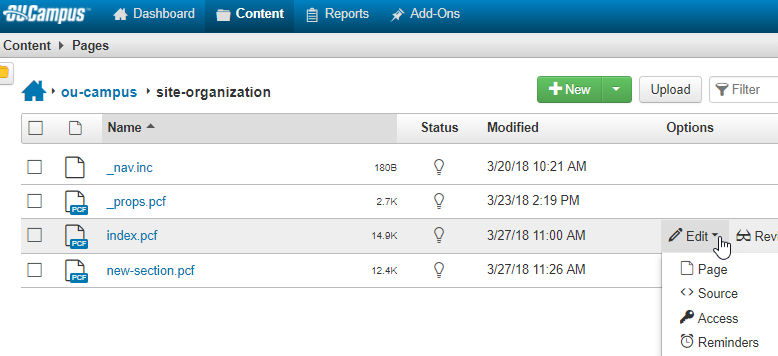
From the Page View each file has four visible options to the right of each .pcf file: Edit, Review, Publish and File. Mouseover each option to open submenus below them based on type of modification to be made.
- Select: Content - mouseover the .pcf (publish control file) to be edited it will turn light gray and options; Edit, Review, Publish and File will appear.
- Select arrow next to desired option for drop-down menu to appear.
* If these options do not appear this means you do not have authority for making these changes. Consult with your account administrator about increasing your user access level or find out who could make these changes for you.
Edit Options
- There are 4 options: Page (view the page), Source (view source code), Properties (page properties) Access (access settings), Reminders (schedule a page to be published or set up a reminder to update your page because the information is stale).
Edit a Page
- Click the file name link of that page (i.e., "index.pcf"). If the page is checked out, you will need to contact the person who has it checked out, to ask them to publish their changes and/or check it in.
- A preview of the page will open. Each editable area of the page will have its own green Edit button
- Click the Edit button for the area of the page you want to change
- The editable area will open in the editor
- Make the changes you want to make
- To check for typographical errors, click the Toggle Spell Checker button (a check mark with ABC above it). If there are no problems, you will see a message saying "No misspelled words found." Otherwise, all words not recognized by the spell checker will be underlined with a red line. Clicking the word will bring up a list of suggestions. Click the suggested replacement in the case of a misspelled word, or the "Add to Dictionary" in the case of a correctly spelled word that is not yet in the dictionary
- Click the Save button
- If you want to abandon the changes you have made, click the "Restore last draft" icon
- Click the Publish button to push the changes to the production server.
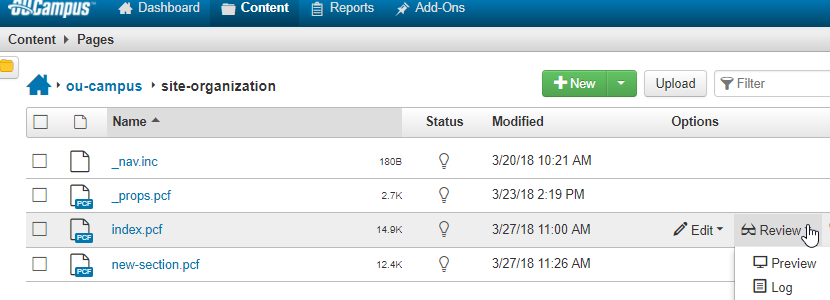
Review
- Two Review options available: Preview (page without edit tabs) or Log (view history of who created/updated the page)
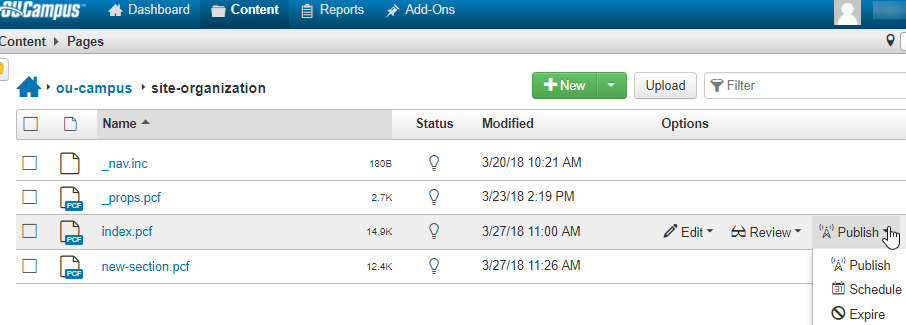
Publish
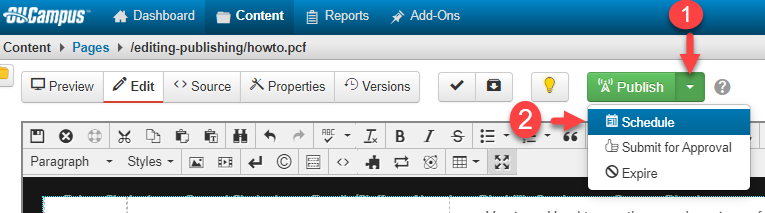
1. Three Publish options: Publish (still have option to run all test first), Schedule (schedule the page to auto publish at a future date) and Expire (expire a page on certain date and time)
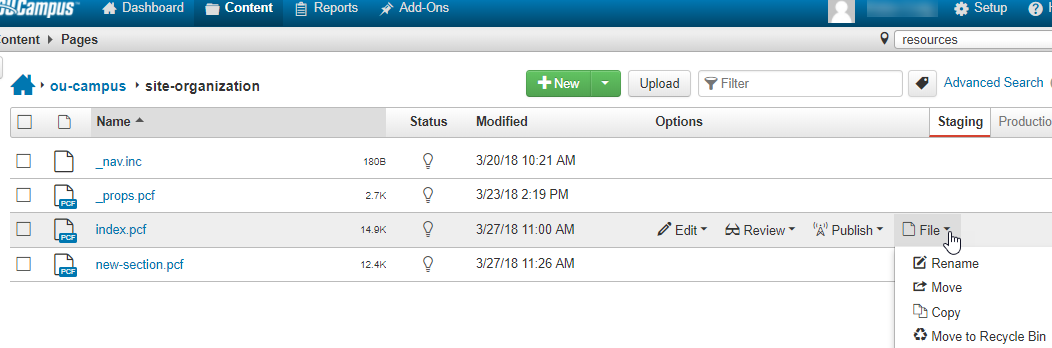
File
- Rename, Move (default places file in current directory), Copy (copied files have '-1' added to the name of the file copied) and Move to Recycle - files can be retrieved from recycle via Contact option in global navigation however, the recycle bin gets emptied routinely so don't rely on it always being there for retrieval.
*** Folders/sections only have Delete option not Move to Recycle and they cannot be recovered once deleted.
- Check your page out by clicking the light bulb icon
- Select > "Properties"
- Overlay the page title from the "Title" field
- Click Save
- Click Publish
General
Business Template:
- update /_resources/includes/main-nav.pcf then publish changes. By default all pages
will load /_resources/includes/main-nav.aspx until the user overrides this using the
directory variable main-nav-include for a specific section.
- Note: All pages will use the include /_resources/includes/_staging/main-nav.inc within the staging environment.
- Publish the PCF to include and view the changes on the production server.
- You get a live preview of the changes while editing the main-nav.pcf.
- Editable regions - The PCF consists of three editable regions and one table transformation
snippet.
- Department Links - An editable region containing li nodes, only li nodes will be copied from this region and rendered into the first column of the down menu. Content is the same for all drop-downs.
- Description - The content for the fourth column of the drop-down. Content is the same for all drop-downs.
- Main Nav - A table transformation snippet consisting of two columns and as many rows
and menu items are needed.
- Column 1 - Menu item titles.
- Column 2 - A list of links that XSL will split into two columns to render in the second and third columns of the drop-downs.
- Note: The "Stay Connected" contented is being pulled from the include located here /_resources/includes/stay-connected.inc
- _nav.inc files contain links to pages in a section. JavaScript and XSL will nest a sub-sections link within its parent section links.
Left Navigation Properties (optional)
Updated in props.pcf (enabled through ![]() option)
option)
- Section Title - The title for the section in the breadcrumbs.
- Top Image - The image to appear above page content for all of the pages in a section that have the "Top Image" parameter toggled on and the "Editable Region" parameter toggled off.
- Sidebar Title - The title of the link appearing above the sidebar navigation.
- Sidebar Link - The destination for the sidebar title link.
- Action Buttons - A file chooser to choose the path of the action buttons include file to display for a section when a page's parameter "Action Buttons" is toggled on.
- Contact Information - Various fields to enter contact information to appear in a page's
sidebar when the parameter "Contact Info" is toggle on.
- Office Name
- Office Link
- Building
- Room
- Address
- Days
- Hours
- Phone
- Fax - Optional
- Email - Optional
Page versions allows you to view, compare or revert to previously saved versions of a page.
Omni CMS has a version control system in place to allow you to revert to previously saved versions of a page. This allows you to revert to a previous version of a page, and to discard any edits that have been made since that version was saved. Every time a page file is sent for approval, a version of that page is saved through the automatic version control system. You can also save a new version without submitting a page for approval by following the steps below.
- Open a page to Edit View.
- Check out the Page.
- From the Page Actions Toolbar, click the Save Version icon.
- This will bring up a modal with a box for Version Description. Enter a description to document the version saved.
- Once finished, click Save Version.
The Versions screen of a page is where you go to manage the saved versions of the page. To access the Versions screen for a page:
- Open a Page in Omni CMS.
- Check out the page.
- While viewing the checked out page, click the Versions button from the Page Actions Toolbar. This displays the Versions screen.
- On the Versions screen you will see a list of all saved versions of the page.
From the Versions screen, a version of the page can be viewed. These views of a page version are provided in a separate browser window or tab.
- From the Versions screen, hover over the row for the version.
- While hovering over the row, find View from the options column (far right).
- From View, select Page.
- The version of the page is displayed.
The Versions screen includes the ability to revert to a previous version of a page.
- From the Versions screen, hover over the row for the version.
- While hovering over the row click Revert from under the options column (far right).
- A confirmation dialog will display.
- Click Revert.
- A success message shows to which version the page was reverted.
Note: Reverting to the Version will not make the page live (in a workflow). It will only be changed to edit view. In order to publish the version, you will need to submit the page for approval.
To make edits to a page, you must login and navigate through the page view hierarchy.
In order to make edits to a page, you need to login and view the page inside of Omni CMS. The easiest way to do so is by logging into Omni CMS through Direct Edit.
- Go to the page you wish to edit on your live website in Omni CMS.
- Scroll to the bottom and click on the Last Update Icon in the footer.
- Enter your SDSU ID and password.
- Click Login.
- Once you are logged in, you will be taken directly to the page you were on in the live site, but now viewing it in Omni CMS.
You can also view the page in Omni CMS by navigating to it through the folder structure on the Page List Area of Omni CMS.
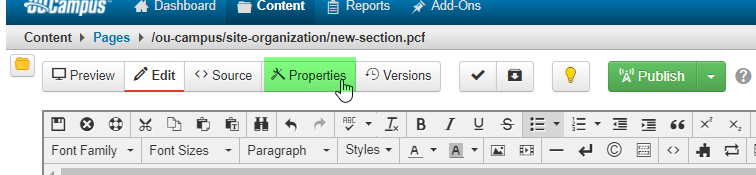
When you view a page in Omni CMS, you will see a Page Actions Toolbar at the top of the page. This toolbar gives you access to a variety of actions. Note that the available actions change once you Check Out the page.
Page Actions Toolbar When a Page is not Checked Out

Page Actions Toolbar When you Have the Page Checked Out

The Page Actions Toolbar includes the following functionality:
- Preview: Displays the page in preview mode. This is how you can see what your page will look like once it is published.
- Edit: Displays the page in edit mode, which includes editable regions. You will need to click Edit in order to access the WYSIWYG Editor for a page and begin making edits.
- Properties: From the Properties link you will be able to access a Log of all activity for that page. Additionally, you can set reminders for the page, i.e. Set a reminder to update your page, change content, etc.
- Versions: Used to see the saved versions of the page. Learn more about Page Versions.
- Page Check: Clicking the Page Check icon displays the Page Check modal with the ability to check your page for Spelling Errors, Broken Links, and Accessibility Errors.
- Save Version: Allows you to save a version of the current page, which is a useful action to perform before other actions such as a find and replace.
- Check Out/In pages.
- Submit: Allows you to submit your page for approval to publish.
Schedule Page to be Published
When pages are scheduled to be published they will only be published every 15 minutes. In other words, at 10:00 AM, 10:15 AM, 10:30 AM, and 10:45 AM the system will check whether there are any files scheduled to publish at or before that time and publish them. Anything scheduled to publish between 10:01 AM and 10:15 AM will go out at 10:15 AM. 10:16 to 10:30 will go out at 10:30, etc.
If a page must be published outside of 15 minute increments (e.g. 1:22 PM), it must be manually published at 1: 22 PM.
From inside checked out page:
- Select arrow next to Publish tab, choose Schedule.
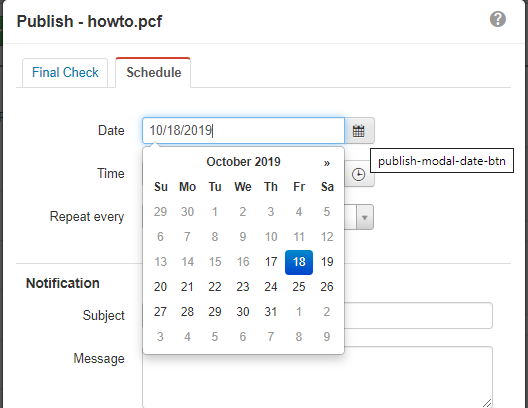
- Select date from calendar icon:
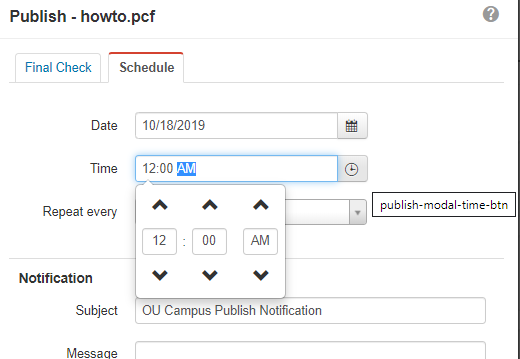
- Select: Time and AM or PM
- Optional: "Repeat every": include number of times to be scheduled.
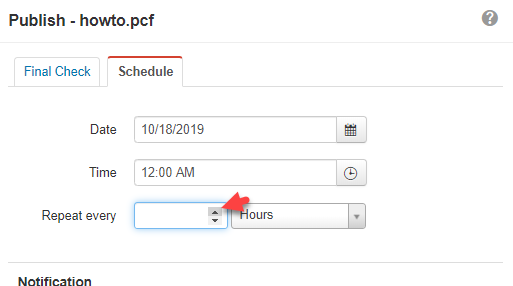
- If a number is selected by "Repeat every" then incremental time should be selected
too. Choices: hours (default), days, weeks, months, or years.
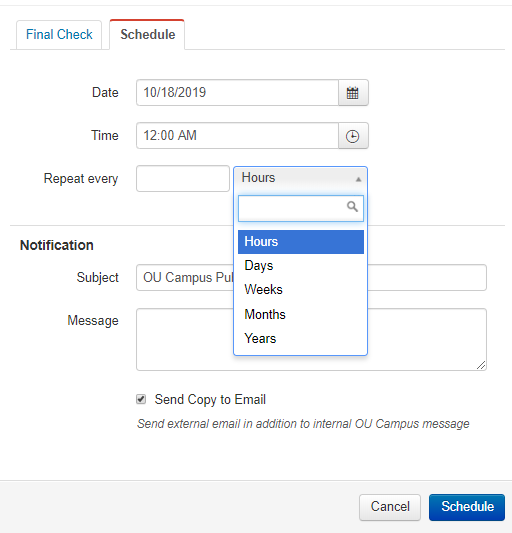
Notification: add Subject title and message to be emailed to you (optional), select Schedule.
Keep the page checked out (light bulb yellow) until page publishes at scheduled time. This prevents others from updating it and potentially publishing your changes prior to desired time.
Schedule Page to Expire
From checked out page to be expired:
- Select arrow next to Publish tab, choose Expire

- Expire Type: select Recycle
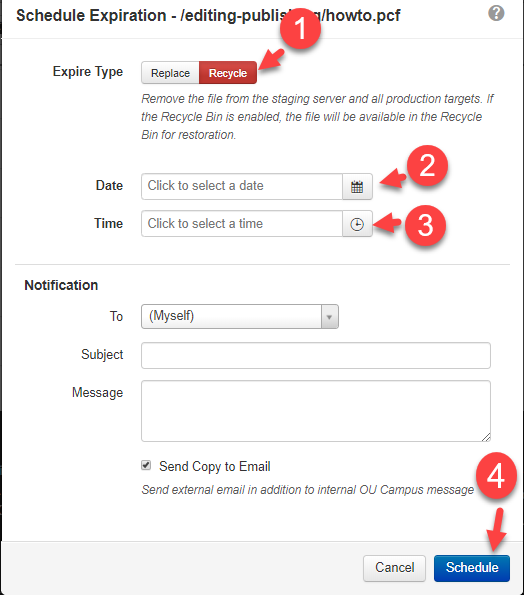
- Date: select from calendar
- Time: select from icon
- Select: Schedule
Schedule Expiration and Replace
- From checked out page in Publish tab select Expire from drop down menu
- Expire Type: choose Replace
- Date: select from calendar icon
- Time: select from icon
- Replace With: choose replacement file using icon to choose file:

- Select: Schedule
After edits are finished, conduct a final page review prior to submitting for approval or publishing them:
- Click Save and Exit once your final edit is complete.
- From the Page Actions Toolbar, click Preview.
- This will allow you to view the page as it will be appear live.
- Design for mobile size to ensure layout remains good for all other devices. Shrink your screen down to phone size to ensure responsive web design remains in tact.
- From the Preview, review your page to make sure that everything is being displayed correctly and adheres to the Standards and Guidelines.
- If you notice any mistakes, return to the Edit View and use the WYSIWYG editor to fix mistakes. If there are no mistakes, move to Step 2 of the review process.
Accessibility Check
The Accessibility Check is somewhat more complicated than the rest. Use our Accessibility Check tutorial to learn more about using this feature of the page check. The Page Check runs through your page and identifies any spelling, link or accessibility errors.
- From the Page Actions Toolbar, click on the Page Check Button (look for the Check icon). Note: that the Page Check button is only available if you have the page checked out.
- Click the Page Check button.
- The Page Check modal will appear where your can choose which checks to run.
- Click the “Run All Button.” This will run all page checks (Links, Spelling, and Accessibility) simultaneously.
- After running each check, the item is shown in red if there were errors, warnings, or other issues in the results. The results can be viewed by clicking Show Results under the button. The item is shown in green and will indicate “No errors are found.”
- Click the blue “Done” button when finished reviewing the results.
- If there were errors, return to the Edit View and fix in the errors using the WYSIWYG editor.
- If there were no errors, you are done with the Page Check.
After previewing your page and completing the Page Check, you are now ready to submit the page for approval for publish.
- From the Page Actions Toolbar, click Submit.
- The Submit for Approval Modal will appear.
- Write a message with any necessary directions and click Submit.
- Your message will be sent to your assigned approver.
- Your assigned approver will then review the page and either submit for approval or return the page to you to make additional edits.
- While waiting for approval, you may continue to follow the status of your edits from your Workflows Screen (under Dashboard option).
The toolbar is used for editing tasks for a files such as: inserting links, applying formatting (e.g. bold or italics), and spell checking a page.
Click the Save and Exit Icon to save your work and exit the Editor.
Exit the editor without saving your work. All updates or changes made since your last save will be lost.
To remove content from the document in order move it somewhere else, highlight the content and click the icon. The keyboard shortcut is CTRL+X for Windows or CMD-X for Mac.
To copy content from the page, highlight the content and click the icon. The keyboard shortcut is CTRL+C for Windows or CMD-C for Mac.
To paste content onto a page, click the location the content should be placed on the page and click the icon. The keyboard shortcut is CTRL+V for Windows or CMD-V for Mac. All formatting from the content you are pasting will be removed prior to pasting.
Click to undo the last changes made in this session step-by-step. The keyboard shortcut is CTRL+Z for Windows or CMD-Z for Mac.
Click to redo changes that were previously undone and should be restored.
The Spell Check is a Toggle Spell Checker. Click the Spellcheck Icon to spell check the region that you are editing. Misspelled words are underlined in red. You can change the incorrectly spelled word with the suggested words provided or choose to Ignore the incorrectly spelled word (e.g., not make any changes to it). Click the Spellcheck Icon again to turn the spellchecker off.
To insert a table, position the cursor in the editor where you would like the table inserted, then click the icon. The Table drop-down includes several fields that can be used to define the table including:
- Insert Table — Add a new table to the page
- Table Properties — To make changes to an existing table
- Delete Table
- Cell — To make changes to an existing cell in the table
- Row — To insert a new row, delete a current one, or change the Row Properties
- Column — To Insert an additional column to your table or delete an existing column
Accessibility Check option is for checking pages for any issues that conflict with our accessibility policy.
When putting content in a website, make sure it meets our standards. In Omni CMS, there is an Accessibility Check to check pages for any issues that conflict with Web content accessibility standards. The Accessibility Check does not check documents (i.e. PDFs) that are attached to the page, it will only check the page content itself.
- View the page you wish to check in Omni CMS.
- Make sure the page is checked out to you.
- From the Page Actions toolbar, click the Page Check button.
- This will display the Page Check modal.
- Click the Accessibility button to run the check.
If after running an Accessibility Check errors were found, click the Show Results link (this will be displayed under the Accessibility button on the Page Check modal).
This will display the Accessibility Check Results modal. This modal displays a list view of all problems, including likely issues. Each item displayed in the Accessibility Check Results modal includes a reference to the exact line in which the errors were found and an explanation of the problem. View our list of most common accessibility errors.
Likely Problems are items that the Omni CMS system identifies as most likely being an error, but should be reviewed by a user to determine if the problem is real or not. If you receive Likely Problems, review the problem(s) and confirm whether or not any changes need to be made.
Once you review the Accessibility Check Results, return to the Page Edit View. Using the WYSIWYG editor, make the necessary changes to fix any accessibility problems.
Once you have fixed the error(s), re-run the accessibility check to confirm that the page is fixed.
When all Accessibility Errors have been fixed, you will see a Green Button indicating that it has passed the Accessibility Check.
All videos on SDSU websites must be captioned to meet CSU Accessibility Standards.
Add your own subtitles and closed captions
Creating Subtitles and Closed Captions Training Video (click on Closed Caption/Subtitles icon (CC) to view captions)
If automatic captions option is used while creating a video, edit or remove any captions that were not properly transcribed.
Paid Services
Paid service through CSU Campuses. Read Instructional Materials Captioning information.
List of icon options for snippets.
Available snippet options.
Available style/class options.