Before You Edit
Get familiar with the rules of editing in OU Campus regarding cut and paste, formats, styles, basic edits, publishing and Uniform Resource Locator (URLs).
Formatting is already applied to the text on your pages to make sure they are accessible and follow the Standards and Guidelines. The information below should be used to add new text to your page. It is best practice to leave the current formatting as is.
If content is being copied from elsewhere (i.e. document or website):
- From original source: highlight content to be copied, then right-click and select Copy from the menu or press CTRL + C (CMD + C on Mac) simultaneously
- In OU Campus: go to the page and select the editable region where content is to be
pasted and press CTRL + V (CMD + V on Mac) simultaneously then select Clear Formatting
 to remove extraneous source code (from original document or website) that may not
be visible but will affect rendered page.
to remove extraneous source code (from original document or website) that may not
be visible but will affect rendered page.
Alternatively, enable the Paste as Text option in OU Campus before pasting content into the region.
- Use lowercase letters, numbers, and hyphens (-) for section, folder, page, and file names.
- Do not use spaces (use hyphens (-) to separate words in names).
- Files prefixed with underscores (_) are generally shared files.
- Create short, concise names (e.g. contact or events-staff).
- If multiple files share a prefix, consider grouping them into a section (e.g. events-staff, events-students, and events-all may become events/staff, events/students, and events/index)
The Format dropdown on the toolbar allows for a pre-defined element to be applied to text by selecting the element from the list, including headings.
Address
The <address> tag defines the contact information for the author/owner of a document or an article.
If the <address> element is inside the <body> element, it represents contact information for the document.
If the <address> element is inside an <article> element, it represents contact information for that article.
DIV
The <div> element is very often used together with CSS, to layout a web page.
Note: By default, browsers always place a line break before and after the <div> element. However, this can be changed with CSS.
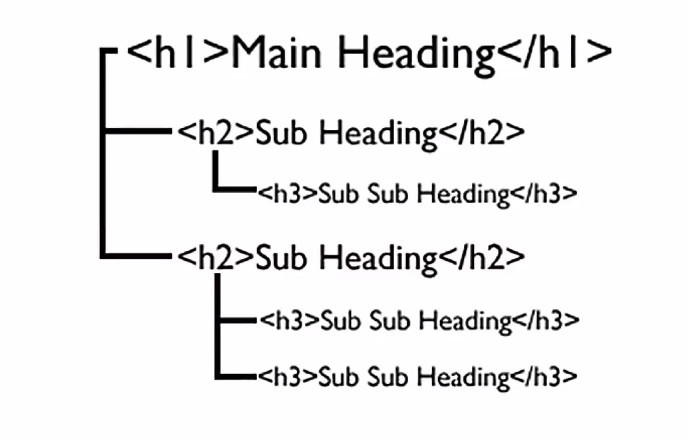
Headings
The heading element not only changes the style of the text, but also adds code known as semantic markup to identify the structure of your content. It is very important to use headings correctly to make sure your content is accessible.
Headings should be applied in a hierarchical order (similar to an outline).
Heading 1
The most important heading on the page, there will only be one Heading 1 and this will always be applied to the page title. You do not need to add a Heading 1.
Heading 2
The first subheading of the page.
Heading 3-6
Are additional headings under a Heading 2.
 Paragraph
A paragraph is for basic text. If you do not apply a format element to your text, it will automatically be marked up as paragraph text.
Blockquote
The blockquote element is used to indicate a quotation of a large section of text from another source. It will also change the style of the quote.
This is what a blockquote looks like when applied from class drop-down menu.
Remove or Change the Applied Format
- Place the cursor within an existing block of text, on a blank line, or select the text
- Click the format dropdown, the applied format will be highlighted
- Click the currently applied format to deselect it, this will change the text to Paragraph or choose a different element.
Check Styles Before You Edit
The current text on your pages has already had styles applied to it. Make sure that styling adheres to current design. The information below should be referenced when adding text to a page. It’s best practice to leave the current styles as is.
How to Apply Styles Using a Class
Our Class Portfolio shows how they appear when applied.
Text/Links
- Highlight text to be styled
- Right click mouse
- Select Insert/Edit ink option
- New window opens
- If this will be a link: use the file finder to link to correct page in OU (external
URL requires full address https://xxx.xxx.xxx)
If this is not a link: only complete the Text to display and Class fields. (If you highlight the content before inserting link the Text to display field will automatically populate.) - Select desired Class option from drop-down menu
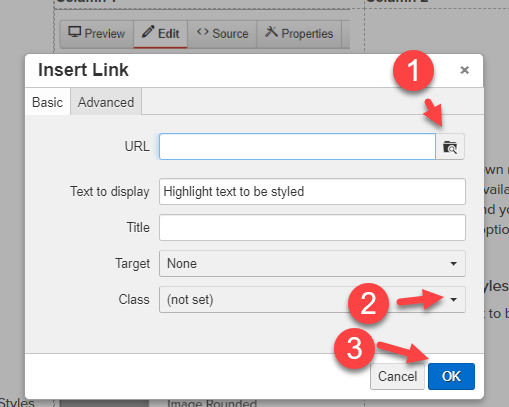
- Options appear after you select the arrow next to Class:

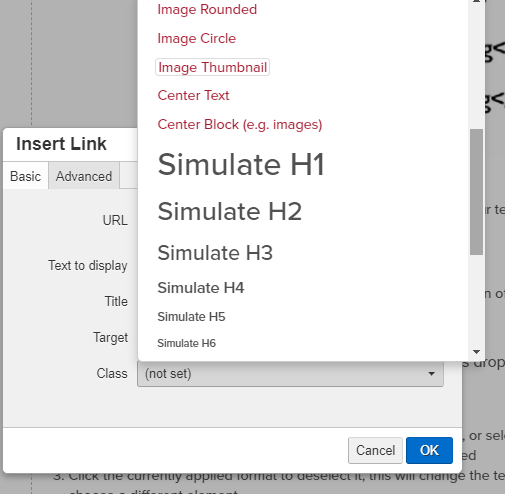
- Select desired option then 'OK' when finished.
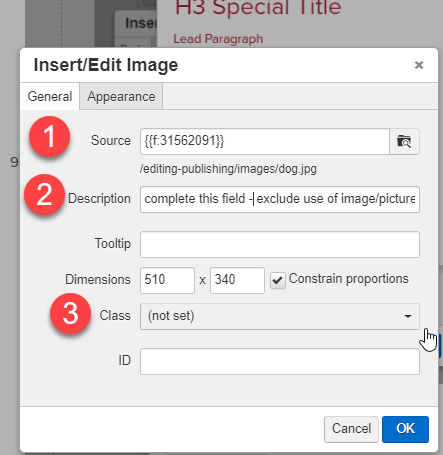
Images
- Insert/Edit Image (either icon or right click mouse and select option)
- Select: source, add description (eliminating the use of image and picture), then choose a class to be applied, select OK.
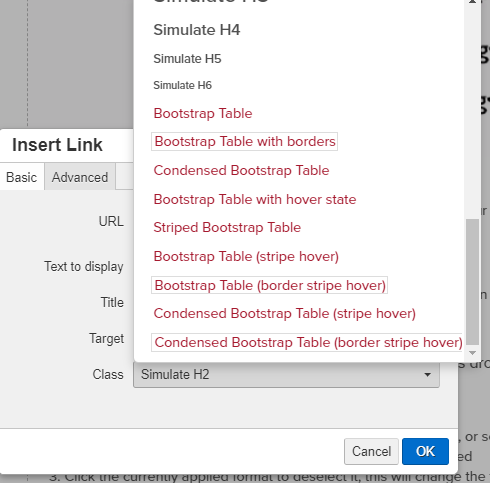
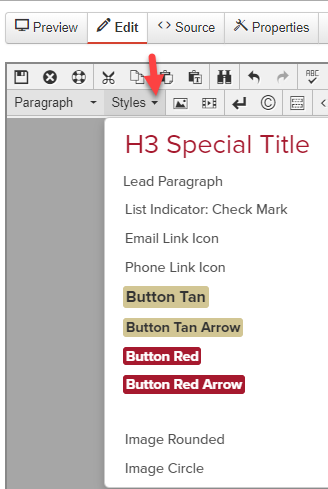
If an applied class does not work as expected, insert the class you want from the Styles drop down menu instead:
- If you are not already logged in to OU Campus, browse to the page you want to edit, click the "Last Modified MM/DD/YY" on the page footer, and log in with your SDSU Shibboleth Login credentials.
- If you are already logged in, select 'Content' tab > 'Pages', and navigate to the page you want to edit.
- Click the file name link of that page (i.e., "index.pcf"). If the page is checked out, you will need to contact the person who has it checked out, to ask them to publish their changes and/or check it in. * If a page is checked out a lock will appear on the same line, mouse over it to find out who has it locked.
- A preview of the page will open. Each editable area of the page will have its own green Edit button
- Click the Edit button for the area of the page you want to change
- The editable area will open in the editor
- Make the necessary changes while following Formats (tab) instructions.
- To check for typographical errors, click the Toggle Spell Checker button (a check mark with ABC above it).
- If there are no problems, you will see a message saying "No misspelled words found." Otherwise, all words not recognized by the spell checker will be underlined with a red line.
- Clicking the word will bring up a list of suggestions. Click the correct suggested option to replace misspelled word.
- Click the 'Save' button
While reviewing edits, check the following to make sure it is ready to be published:
- Follow our Standards and Guidelines.
- Test your pages at mobile size to ensure design will render properly across all platforms (phone, iPad, desktop). In Preview mode: resize the window placing cursor at the edge of the browser window (arrow will appear), hold mouse down and drag it to shrink window down to cell phone size. If content does not read from left to right then modify page to correct issue before publishing it.
- After saving changes, Preview the page.
Before Publishing Page
'Run All' test to ensure spelling is correct and content is accessible. Close window (if errors are found) and fix them before publishing the page. Notify your OU Account Administrator for assistance with accessibility errors.
- Click the 'Publish' button to push the changes to the production server.
- If you want to abandon the change you made:
- Go into the page
- Check Out the page
- Select 'Versions'
- Mouseover the previous version of page and the 'Revert' option will appear.
- Select 'Revert'
If 'Submit' is the only option, this indicates all changes require edit approvals.
Publishing
- When deleting pages; update the _nav.inc first (remove the page link before deleting the page itself). Publish the updated _nav.inc file.
- When adding new pages; publish the page before publishing the updated _nav.inc
- Preview pages before Publishing them until page is finished. Don’t forget to Publish when done.
- Check pages back in before logging out via Dashboard or Gadget.
URLs
- Use complete email addresses (e.g. [email protected]) for email links instead of names
without the actual address.
- This method is accessible-friendly for those who do not have their email client setup to automatically open, they would have no way of knowing the address.
- If the email address can't be used in the link text, include it in the link's title (e.g. "email [email protected]")
- When inserting a website link, use the full URL and provide user-friendly "Text to
Display" field. For example:
- URL would be https://www.google.com/
- "Text to Display" field Google (e.g. Google)
- Do not duplicate the value of the "Text to Display" field in the "Title" field. Only use the "Title" field to clarify the destination if the "Text to Display" might not be enough for the user to determine where the link is taking them.
Any content added to the website may be changed by Information Technology Division (ITD) Web Services & Infrastructure at any time, if it fails to meet basic writing style, visual style, or accessibility guidelines.