Advanced Edits
OU Campus includes preconfigured code called snippets and assets that can be inserted into your web pages for customization. It reduces the requirement for programming knowledge.
Add and edit rows and columns, forms, images, calendar, newsfeed, social media, etc. These are content management tools that are easy to use.
Images must be the same size within a snippet or asset.
Snippets are pre-configured code designed to be inserted into pages and modified by the content contributor. They are used to help ensure standard formatting, layout and design of page items. When using a snippet, you may edit the content (i.e. the text, files, or images), but the style, layout, and format of the content will stay consistent.
To edit the content of your snippets, access the editor for your page via Last Updated MM/DD/YY link in footer at the bottom of the page.
- Go to the web page to be updated (e.g. bfa.sdsu.edu)
- Login procedures from Direct Edit link in page footer ‘Last Updated MM/DD/YY’, enter: SDSUid credentials
- When in Edit View of the editor, snippets will not look the same as they do on the live site. Instead, they will be displayed as a “Snippet Edit Table,” only displaying the content of the snippet, not the styling.
- Though the look of a Snippet Edit Table varies for each type of snippet, you will always see a table for a snippet when you are inside the editor for a page.
- Once you are in the editor for the page you are editing, you can change the content within a snippet just like you would edit regular page content. Each snippet is organized somewhat differently and has different content areas you can edit. View our Snippet Portfolio to see available snippets.
- In editable region of page, place cursor where snippet is to be inserted
- Select the puzzle piece icon

- Select snippet from left column, it will appear in right column, then insert.
- Start editing in the snippet or Save and Exit to view appearance in Preview mode to verify appearance/function is what you envisioned.
- Return to edit mode then add content inside snippet.
The Dos and Don’ts of Editing Snippets
- Snippets can be a little temperamental. It’s very easy to delete the wrong thing which will result in the snippet being broken. So it’s important to follow our snippet dos and don’ts:
Save a Version First
Before editing snippets, always save a version of the page first. In case the snippet edits go wrong, you can always revert back to the saved page version.
- Inside editor of checked out page is an icon with a downward arrow (next to yellow light bulb). Click on it (Save Version icon) then add a version description as a reminder to what changed then click on 'Save Version'.
- Now editing may begin.
Use Caution When Deleting a Snippet Edit Table
- If you no longer want the snippet or any of its content on the page, ask a higher level user for help. If you delete it improperly, it may cause errors. Even if you highlight the whole Snippet Edit Table, it will often leave “code and/or content” behind which will cause errors on your page.
Don’t Insert Styles or Change Formatting Before Saving a Version
- In Staging, the snippets will display text in preconfigured formats and styles. Be very cautious when trying to add different styles to the text in a snippet. Doing so may return unexpected results. You may need to select 'Restore to last draft' icon to recover from changes.
Do not Copy and Paste Content In Snippets
- Doing so almost always breaks the snippet. When editing a snippet, it’s best practice to just type content directly into the Snippet Edit Table — don’t paste it from somewhere else. It may be tedious up front, but will save you time in the end.
Assets are reusable pieces of content that can be placed on multiple pages. When an asset is edited and published, all pages that include the asset are automatically published with the changes. Assets make it convenient to update multiple pages that require the exact same information (i.e. the department phone number, hours, location, e-mail address, fax number forms, etc.).
You must have level 8 permission or higher to access assets. Contact your OU Account Administrator if assistance is required to edit assets.
What You Can Edit
As a Content Contributor you have the ability to edit your department/area owned asset. If your page includes the asset of your department’s phone number, you will be able to edit it. If your page includes assets that are owned by other departments, you cannot edit them.
For example, if some of your pages refers students to contact a Counselor and the phone number is in an asset, you will not be able to edit that asset as it is owned by Counseling. But, if Counseling changes their phone number and updates their asset, your page will automatically be updated.
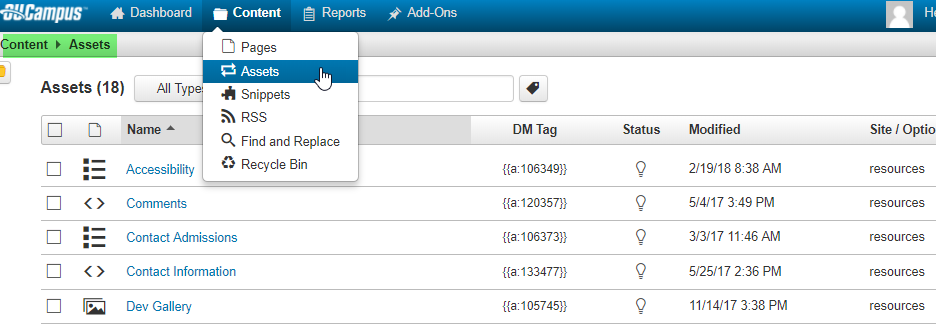
- Login into OU Campus.
- From the Global Navigation (blue bar at the top) hover your mouse over “Content” and click on Assets.
- This will show you a list of all the assets in OU Campus.
- The names of the assets you have permission to edit will be listed as blue links. The assets that you cannot edit will be black and cannot be clicked on.
- Click on the name of the Asset you wish to edit (Assets are managed from the Assets List View not from the page editor.)
- Check Out the Asset by clicking the check out light bulb icon. (Checking out an asset follows the same rules as checking out a page.)
- Click Edit and Properties from the Page Actions Toolbar. Once you click edit, a editor will open and you can make changes to the asset, just as you would make text edits to a page.
- When finished with editing the asset, save the asset by clicking the Blue Save button at the bottom of the page.
This is how it will appear from staging view until you Preview it:

Publish the updated asset.
Edit Gallery Asset
- Select: Content
- Assets
- Select: Gallery asset - if it is not blue then you have not been given access to modify it. Contact responsible OU Account Administrator regarding access.
- Check Out the asset by clicking on light bulb (light bulb turns yellow)
- Select 'Edit' and 'Properties' options then add or remove image/content.
- Add: image by drag and dropping image from your desktop into Image Gallery (a green box will appear -- drop image inside). Or use 'Add' option at bottom, then locate image on computer, select it, a new box will appear with the image, populate the fields beneath the image and Save.
- Delete: find image to be removed then select 'X' in box with image to remove it.
Create New Gallery
- New (tab)
- Select: Image Gallery
- Check Out the asset
- Click on the Properties & Edit options
- Scroll down to Add to add a new image, a new box with image will appear.
- Populate fields: title , description, caption and link (if desired).
- To remove an image: click on the 'X' within the box and it will disappear.
View available snippet options
IconsList of icon options for snippets.
Class PortfolioView available style options.